A few drips from a drum do not look like much – until they run down the side, collect grit, mark the workshop floor and turn every refill into a sticky job. Whether you are handling rainwater, oil, biodiesel, chemicals or cleaning fluid, learning how to stop drum drips starts with treating the outlet as a system rather than blaming the liquid.
The drum, cap or bung, tap, seal, hose and receiving container all need to work together. Get one part wrong and liquid will find the gap, cling to the spout or continue flowing after you have finished pouring. The good news is that most dripping problems have a simple, practical cause.
Find out where the drip starts
Before buying another fitting, wipe the drum outlet completely dry and watch what happens during a controlled pour. A drip appearing at the thread is a sealing problem. A drip forming at the end of a spout after the flow stops is usually retained liquid. A slow leak from a tap body points to a worn seal, poor-quality valve or incompatible material.
The four most common causes are:
- a loose, cross-threaded or wrongly sized fitting;
- a missing, damaged or chemically unsuitable washer or gasket;
- a short, blunt outlet that leaves liquid hanging on its edge; and
- a drum that cannot vent properly, causing surging and an untidy final glug.
These faults can look similar from the floor, but the cure is different. Do not keep tightening a fitting that has the wrong thread or no proper seal. Excess force can distort plastic threads, crack a cap or make the next removal far more difficult.
Match the fitting to the drum and liquid
Drums are not all built to one standard. Many larger plastic drums use a 2-inch bung, while smaller containers, jerry cans and specialist drums can use a different neck size, pitch or thread form. Measure the existing opening or identify the drum specification before choosing a tap, adaptor or pouring spout.
Thread compatibility matters just as much as diameter. A fitting may appear to screw on, yet only engage for a turn or two. That is not a secure installation. It is likely to weep under the weight of the liquid or pull sideways when a hose is connected.
Material choice matters too. Water is forgiving; fuels, biodiesel, oils, solvents and cleaning chemicals are not. A seal that works well with rainwater may swell, harden or degrade when used with another liquid. Check the drum label and safety data information, then choose a fitting and gasket designed for that fluid. If there is any doubt, avoid improvised seals and generic hose pushed over an outlet that was never intended to carry it.
For fuel and chemical containers, also work in a well-ventilated area, keep ignition sources away and deal with spills according to the product instructions. A cleaner transfer is useful, but safe handling comes first.
How to stop drum drips at the thread
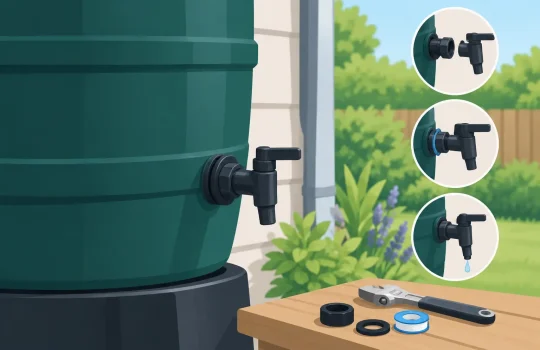
A thread leak needs a positive seal, not blind tightening. Remove the tap or cap, clean away old residue from both mating surfaces, then inspect the threads in good light. Look for flattened sections, cracks, dirt lodged in the groove and signs that the fitting has been forced on at an angle.
Fit the correct washer or gasket in the position intended by the manufacturer. On many drum fittings, the gasket does the sealing while the thread simply pulls the parts together. Adding thread tape where a face seal is required can actually prevent the fitting from seating squarely. It may feel tighter while still leaking.
Screw the fitting on by hand first. If it does not turn smoothly, stop and realign it. Once seated, tighten firmly but sensibly. Plastic drum necks and caps do not reward brute force. Fill or tilt the drum only enough to put the connection under pressure, then check for moisture around the joint with a dry tissue or clean cloth.
If the joint still weeps, replace the seal before replacing everything else. Washers are small components, but they do a large share of the work. A compressed, nicked or incompatible gasket is often the entire problem.
Use a proper anti-drip outlet, not a makeshift pour
The end of the outlet is where most annoying drips begin. A plain open tube or cut-down cap gives liquid a broad edge to cling to. Once you stop pouring, that liquid tracks underneath the outlet and releases itself onto the drum, your hand or the floor.
A purpose-designed spout gives the liquid a defined path. A longer outlet reaches further into the receiving container, while a narrower end helps control the stream. An anti-drip lip or return feature encourages the last of the liquid back towards the spout instead of down its outside. It is a small detail with a very obvious payoff when you are filling regularly.
The right choice depends on how you use the drum. For occasional decanting into a wide bucket, a secure pouring spout may be all you need. For repeated filling of cans, machinery or containers with smaller openings, a tap with a controlled nozzle or hose connection is normally the cleaner option. A long flexible hose can be useful where access is awkward, but it must be supported properly. A hose pulling on a drum tap will eventually make even a good seal leak.
At TMI Shop, that is the thinking behind practical fluid-handling accessories: solve the actual mess at the point it starts, rather than handing you another thing to wipe afterwards.
Control the flow before the final glug
A drum pours badly when air cannot replace the liquid leaving it. The result is pulsing flow, splashing and that last sudden surge just as you try to stop. This is particularly common with sealed containers tipped by hand.
Where the container design allows it, use a separate vent or loosen the appropriate vented cap according to the drum maker’s instructions. Never create a vent by drilling a container used for hazardous liquids, and do not open a second bung without understanding what is inside and how it should be handled. Some drums are designed to stay closed except for a specific dispensing arrangement.
For ordinary non-hazardous water applications, steady ventilation can make pouring far more controlled. Keep the drum at an angle that maintains a smooth flow rather than repeatedly tipping it up and down. As the receiving container approaches full, reduce the angle gradually. This leaves less liquid in the spout and avoids the sharp stop that creates the final drip.
A tap removes much of this problem because the drum remains upright. Gravity does the work, the valve controls the rate, and you are not trying to hold a heavy container at precisely the right angle. It is safer for larger drums and kinder to your back as well.
Keep the outlet clean and supported
Even a correctly fitted tap will drip if dried residue prevents the valve from closing fully. Oils can collect dust, rainwater systems can carry sediment, and sticky liquids can build up around the nozzle. Wipe the outlet after use and operate the valve a few times before storage if the liquid permits. Do not leave a dispensing hose lying on the floor where it can collect contamination and then transfer it back into the drum.
For rainwater and other stored water, keep debris out before it reaches the drum. Leaves, grit and organic matter can obstruct taps, damage seals and create more than a dripping problem. Filtration at the collection or outlet stage makes the whole system easier to maintain.
Support matters when the drum is stored on a rack, bench or stand. The outlet should be clear of obstructions and easy to reach, without the tap carrying the weight of a hose or a full container resting against it. If the drum sits directly on the floor, it is tempting to tilt it, drag it or prop it up with whatever is nearby. A stable raised position makes controlled dispensing much easier.
Know when a replacement is the sensible fix
There is a point where cleaning and new seals are no longer worth the effort. Replace the tap or cap if the body is cracked, the valve does not shut consistently, the threads are stripped, or the fitting material has been damaged by the stored liquid. A slow drip can waste product, create a slip risk and make a workshop look permanently untidy.
It is also worth replacing a poorly designed outlet even if it is not technically broken. If every transfer ends with a rag, a stained drum and a few minutes of clean-up, the fitting is costing you time each time you use it. Purpose-built parts are often cheaper than repeated product loss and frustration.
The best drum setup is not the one that merely fits. It is the one that gives a steady flow, shuts off cleanly and leaves the outside of the container as dry as it was before you started.